HootSuite: Set It Up Properly And Conquer The Twitter
Before Twitter had this great new interface, a lot of options were hidden or to be more precise; they weren’t even there. Scheduling, separate columns for different types of tweets etc. Luckily for you, developers all around the world started to build great Twitter clients like TweetDeck or HootSuite. Personally, I’m a huge fanboy of the latter trying to get all of my friends on the HootSuite’s dashboard.
However, HootSuite might be a little confusing in the start, so take this guide with you and set up your HootSuite account. Once you get the hold of it, you’ll never switch to another Twitter client. Heck, you might even get HootSuite for your iOS or Android device as well!
Hoot Hoot
HootSuite is a web application, which means you’ll run it in your browser. If you mostly work online and/or on social networks, HootSuite might be one of your most important tools you’ll use. Its interface is made out of streams; columns which stream specific kind of tweets: mentions, DM inbox, outbox, sent tweets, Home stream etc. Streams can be grouped into tabs, for your convenience and quick access to different streams and accounts.
Since it’s a web application, you’ll need to set it up only once to make it look the same on every computer you use. Of course, it will take some time to get used to it, but it’ll be worth it. Once you get hooked to it, you’ll maybe want to upgrade your account to Pro for $5.99/month which will allow you unlimited social profiles, one free team member, Analytics report, Google Analytics integration, opting out of advertisements and promoted tweets, ability to archive tweets and much more. We’ll skip Enterprise solutions for now; if you’re a corporation that needs all of those features, you’re probably a HootSuite Ninja (Owl?) already.
Let’s Start
This is the place where all of your social profiles will be. The first thing you need to do is to add some social accounts. We’ll focus on Twitter for now, but you shouldn’t have any troubles with Facebook as well. So, go over to Settings and click Add Social Network. You can add Twitter, Facebook, LinkedIn, Foursquare, Ping.fm, WordPress, MySpace and Mixi. Need more?

You won’t have to enter your Twitter credentials into HootSuite, but you’ll have to connect it with Twitter. Just click the button and authorize HootSuite access to your account. Done!
Preferences
There are some neat features in the Preferences section you should also check out. The first of them is about retweets; Use Twitter Web retweets. While Twitter implemented the so-called “native RT” with a goal to cut the repeating tweets in timelines of their users, a lot of people still like and use the old-style RT. Checking this option will allow you to choose whether you want to retweet a tweet or edit it before.
You should also enable audio and visual notifications for new tweets, but I’d recommend to turn off new social network selector; it can be pretty misleading. You need to check off all the accounts you don’t want to send the message to and leave only the ones you want. If you’re a Pro subscriber, you’ll have the option to show promoted tweets as well.
Learn How Owls Fly
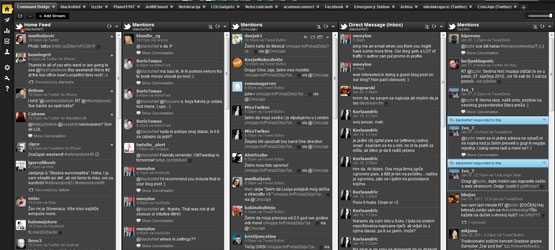
Now that you have added several Twitter profiles and set the preferences, it’s time for some practical tips. The very first thing you need to work out is what you want to see on your first tab, your dashboard. Personally, I renamed mine to “Command Bridge” and it contains Home Feed from my personal account (@blackshtef) and the rest is filled with Mentions and DM inbox messages from other accounts. This way you’ll have everything relevant in sight; Home Feed will give you tweets and mentions and DM streams will take care of that direct communication.
Sometimes you’ll see some tweets in the Home Feed that you’ll want to retweet with some other account. Since Home Feed is connected with one of the accounts, you’ll have to edit it. Luckily, there’s an easy way to do a native RT to another account. Just click the Retweet icon (which appears once you hover the tweet). The question will pop up and you should click on the avatar image to choose the account for retweeting. The same goes for replying – just write the message and choose another account instead of the one holding the Home Feed.
Tabs And More Tabs
Every tab can hold up to 10 streams. If you’re a community manager or just a real social junkie, you’ll need more of them. Create a new tab and let some streams in it. Let me describe my HootSuite tabs setup: Command Bridge is the main tab with Home Feed and mentions/DM inbox for other accounts I’m managing. After that, there are several more tabs (each for every account) with account specific streams inside; Home Feed for that account, mentions, DM inbox and outbox, sent tweets and several search streams for some keywords.
There are some other specific tabs like “Emergency Station” which contain Sent Tweets for every single account, so if a tweet goes out by accident (wrong account of an incomplete tweet) you can remove it easily. Oh, by the way, you don’t have to click Send when composing a tweet – write it up, select the account you’ll use and press Shift+Enter.
Scheduling, Attachments and URL Shortening
HootSuite allows you to schedule tweets, which is a pretty awesome feature. Just compose a tweet as you normally would and click the calendar icon. The Timetable will open up and the tweet will be sent out at that specified time. If you want to send the same tweet several times, make sure that they have something different, an extra hashtag or something like that, because HootSuite won’t sent the same tweet over and over again. You shouldn’t spam your followers!

Attaching an image to a tweet is easy – there’s a little office clip icon in the compose window; click it and select what you want to upload. Every file gets uploaded to ow.ly, HootSuite’s service for handling your files. Finally, there’s a URL shortener; paste the long link inside and click the button – it will get shortened and will be added to your tweet. Simple as that. If you need to add some URL parameters (eg. you’re an analytics ninja and you know what URL parameters are for), HootSuite allows that too – just click on the wheel icon in the URL field.
Themes
HootSuite comes with three themes for its interface; green, blue and dark. The dark one is most similar to TweetDeck, but the blue one is probably the most eye-appealing. The green one is, in my humble opinion, something not worth looking at, but hey, it’s your account and you are free to style it whatever you want.

Team Work
If you’re working on an account with a team of people, HootSuite has some great team features. You can create a stream and share it with your coworkers – useful if you don’t want to share the account (which you can), but only the mentions stream, for example. Account sharing with HootSuite is a great way to give access to the account to the other people without revealing the actual password for the account. Additionally, when your coworkers makes a reply to a tweet, that tweet will get highlighted and everyone in the team will see who responded with what message.

You can also assign a tweet to your coworkers, so once they log in, they’ll see a tweet which requires their attention.
HootSuite is a great tool, no doubt about it. For personal use or for team work, it can handle all of your social networks, just like that. Give it some time and force yourself to use it. Once you get used to it, you won’t let go.