What you Need to Know about WordPress Child Themes

Simple and functional as it is, WordPress doesn’t require you to have coding skills in order to build a great website (this is why we love it so much, after all!). Yet, some knowledge of HTML and CSS is always handy for website owners because it enables them to tweak their pages in different ways.
This is particularly important if you haven’t had time or resources to invest in custom design and you want to make some modifications to your WordPress theme. Although there are thousands of sleek and powerful themes out there, adjusting them to fit your vision is always a good idea.
In fact, WordPress theme customization is quite a widespread practice, mainly because of the fact that it is fairly simple as long as you know some CSS and you understand how WordPress themes work. However, one thing that a large portion of webmasters still fail to understand is that creating a child theme is a key step to take before making any modifications.
Although as much as 50% of WordPress webmasters seem to be unfamiliar with the concept of child themes (according to an Elegant Themes Survey), they have an important purpose in the life of every webmaster who intends to customize his or her main theme.
What is a WordPress child theme?
The main purpose of a child theme is to let you modify your theme without having to edit core files. A child theme inherits the functionality and styling of the original theme and the main reason to use it is the fact that all changes you make to your theme’s core files will be lost as soon as you update the theme!
To help you keep the original files untouched, WordPress offers you the ability to create a child theme and play around with the code any way you like. Of course, you should probably limit your tweaks only to the things that matter for your visitors, but this doesn’t really matter as long as you’re doing it with a child theme.
Therefore, as WordPress Codex suggests, creating a child themes is very important because it enables you to:
– Ensure that your modifications are preserved even after you update your theme
– Speed up development time
– Gain new knowledge about WordPress theme development
Now, of course, to customize your theme you do need some development skills, as well as the understanding of how WordPress themes work.
How WordPress themes work
Once you buy or download a WordPress theme, you get a .zip file that includes style.css, functions.php, images, fonts, templates and many other things. When uploaded and installed to your website, all these turn into the original theme that looks the way its developer intended it to be.
Of course, every website owner will have different requirements from the theme he or she chose. This is why they often want to make some simple modifications and turn the generic theme into a better home for the contents of their website. Before you do any modifications, however, you need to set up a child theme and thus avoid any potential losses.
How to set up a child theme
As opposed to the actual process of theme customization, creating a child theme is relatively simple and can be done even by those with basic HTML and CSS skills.
STEP #1: Create a child theme folder.
The first thing you need to do is to create a separate child theme directory that will be placed in wp-content/themes/. Conventionally, child themes carry the original theme name + the word “child.” For example, if you’re using the Twenty Fifteen theme, the logical name for your child theme will be Twenty Fifteen Child.
STEP #2: Create the stylesheet for your child theme.
Within the folder you’ve created for your child theme, you need to add a new file called style.css. The header of this new style.css document should contain the following lines (whereupon you should replace custom lines with those that matter for your theme):
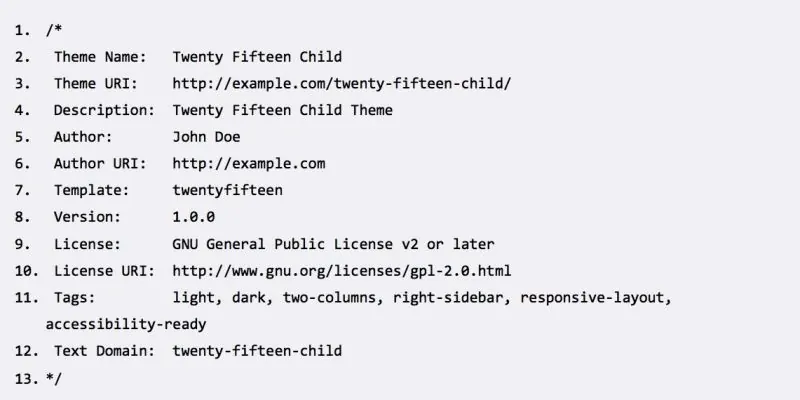
This sample header is suggested by WordPress Codex, but the only elements required here are theme name and template. The Theme Name field is where you need to write the name I already mentioned (Twenty Fifteen Child), while the Template line is the name of your original theme.
STEP 3: Enqueue the stylesheets.
Although the previously created style.css file is the only thing required for your child theme to function, you also need to create a functions.php file in order to properly enqueue stylesheets. Again, a functions.php file should be placed within your child theme directory and its first PHP tag should be <?php. After this, you need to enqueue your parent and child theme stylesheets using the method suggested by Konstantin Kovshenin. Note that while this method is relatively new, it is now officially a recommended way to enqueue stylesheets.
STEP 4: Activate your child theme.
The final step is to activate your child theme by navigating to Appearance -> Themes section and clicking the Activate option just like you would do with a normal theme.
Ready to tweak?
With a wide range of website building resources WordPress puts at your disposal, you practically don’t need to tweak your website extensively. As long as you’ve got a reliable host, perfect domain name and super-compelling content, you can build an online empire. Of course, occasional theme tweaks typically help at creating a better experience for your visitors and this is why you need to understand the importance of creating a child theme.
Once you activate it, you can start modifying the files to customize the theme the way you see fit! Of course, there are many ways to customize a WordPress theme and if you’re not sure how to do this properly, watch our blog for future updates because we’ll soon publish a guide to WordPress theme customization!