How to Setup a Custom Domain on Google Apps
Do you like Gmail? Is Google your best friend? I understand, Google is my best friend too. If you have your own domain name, you might want to use your vanity email like name@domain.me, buy you chose not to because … let’s face it, Gmail rocks. Don’t fret, there is a way to have your cake and eat it too!
Google Apps is a service that will let you use Google’s amazing products with your custom domain name. If you do not have your own domain name, you can purchase one while starting the setup of your Google Apps for $10/year, which is a fairly standard price for a .com/.net domain name. Free version of Google Apps will let you create up to 10 emails for one domain name. Do you want to start setting it up? We will help!
Step 1: Sign up
Start by signing up for your Google Apps product. Google does not show this free link very obviously, because they sell this option for business, but if you need up to 10 email addresses, there is no need to waste your money on paying for this feature. You could, for example, buy a cool domain .me name instead. 😉 To start, you will need to either:
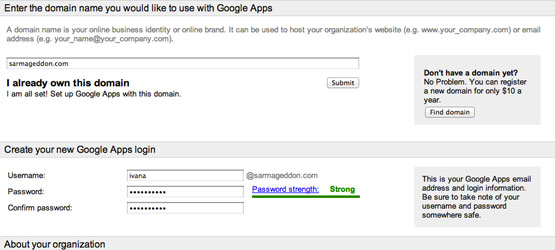
- have ownership and access to FTP of your domain name, or
- purchase one domain during the setup.
After you fill in your information, username, real name, address, etc., you will have to accept their terms and click on Create my account!
Step 2: Choose the speed of this setup
You can choose between Express set up (Google estimates this at 30 minutes) or advanced setup. For a beginner, I recommend going with the express version.
Step 3: Verifying domain ownership
If you have chosen to use a domain you already know, Google will require that you download one file and upload it to your domain for verification. Do not alter the file name, do not change it’s content and do not delete it afterwards. Make sure you upload it to your root folder, so that it can be accessed like this: www.domain.me/filename.html – if you upload it into any other folder, Google will be unable to access it.
If you need some help with this, you can watch Google’s video:
[youtube width=”555″ height=”375″]http://www.youtube.com/watch?v=sce3p2L4rq0[/youtube]
Step 4: Create additional users

If you have your personal website, you can skip this step. If you have more users, this is a chance to create their email addresses as well. Do not worry, you will always be able to add up to 9 additional users (1 address for you + 9 for colleagues = 10 free emails). Since we are presuming you are creating an email address for your personal website/blog, and not an organization, we will move on with the tutorial.
Step 5: Choose your Apps

You will be offered to choose the applications you want to use. Google automatically chose Gmail, Calendar and Drive/Docs for you. If you do not have a website, you can use their application Sites to create your website. Since you probably already have a hosted website somewhere, you do not need Sites.
Gmail
To setup your Gmail, you will first need to select which server should handle your correspondence. Google’s server is the recommended option, so we will stick with that one. To direct your domain’s mailflow to Google’s servers, you need to change your domain’s MX records.
Access your hosting account (I access my CPanel) and alter your MX records. They may be located in DNS Management, Mail Server Configuration, or Name Server Management. You may have to enable advanced settings to edit your MX records. Delete all current data and enter the following information. Keep in mind that it can take up to 48 hours for this change to be processed.

Important!
Bookmark the link you will be using to access your Goole Apps account. Tip: It is http://mail.google.com/a/{yourdomain.me}.
Calendar
Google Calendar is one of the best apps Google offers, in my personal opinion. You can sync it with your computer, tablet or phone, create several different calendars, and you can – and this is my personal favourite – color-code each calendar. With just a few clicks of Next, you will be able to use it.
Drive/Docs
Google Drive and Docs is an integrated service that lets you create, store, and share all types of files and documents. You create documents in Google Docs, then organize and access them in Google Drive. This will, like Calendar, be activated automatically with just two clicks.
That’s it!
We just covered the basics of setting up your Google Apps account. Google, of course, offers more feature. For example, if you want to use your Google Apps via mobile phones or tables, you will be offered to choose between these OS’s: Android, BlackBerry®, iPhone®, Windows® Mobile or Other. Google will guide you through this, and since it is not essential for using your Google Apps, we will skip it in this tutorial.
You could also choose to install more apps from Google Marketplace. You can set up aliases for your username, so you could have nickname@yourdomain.me, as well as firstname@yourdomain.me, firstname.lastname@yourdomain.me, etc. All emails sent to these aliases will come to your original email.
Once you’re done, all you have to do is enjoy your beautiful email address with all the benefits Google offers!